
This is a wiki page and is being constantly improved, please link to the page, not a revision of it!
Please make sure you don't link to old versions of this page. If you came here via a link check if there is a revision number in the address bar. If so, go to the current version of this page
General Info
First of all, note these steps are still experimental and not meant for end users, so if you don't know what you are doing, skip this and wait for something more end user friendly to come.
The "multi root" will let you choose between multiple rootfs images at the startup from your archos.
It uses the same kernel for your different rootfses, namely a modified archos android kernel.
The final goal is to be able to use for example kexec, so it would also be possible to boot different kernels. Sources for the kernel and initramfs are available on gitorious:
http://gitorious.org/archos-buildroots/gen8-kernel
http://gitorious.org/archos-buildroots/gen8
Installing Multi Root on Gen8
Attention Windows users:
When told to "remove/umount device", make sure you actually do it. (missing zImage or initramfs may occur else)
No Windows-related problems will be handled on the chat, ask on Archos forum sites.
First, you have to install SDE from Archos (65MB download).
Instructions on how to install SDE are provided on the page. Once installed, you can proceed.
Download initramfs.cpio.gz and zImage from https://openaos.org/wp-upload/gen8/2012-12-25/kernel_gen8_20121225_093548.tar.gz.
Unpack the archive (using 7zip/WinRar/"tar -zxvf"/…) and keep only initramfs.cpio.gz and zImage.
NOTE: Builds linked here can change and may have bugs
Connect your archos to your PC with the usb cable.
Shutdown your archos by holding down the power button. Go into recovery by holding down the "volume down" button and switch on your archos.
Keep the button pressed until you see the white recovery menu.
Go to "Developer Edition Menu" ➔ "Flash Kernel and initramfs"
Copy the downloaded files to the archos and unmount safely.
When the bootmenu is started it will look for menu.lst on the internal storage of your archos.
In menu.lst you will be able to define your boot menu. If it doesn't exists, it will create a default one for you with the following content:
Archos|ARCHOS|ARCHOS|/init|0
Angstrom||/rootfs.img|/sbin/init|1
Note the blank line at the end; it is required. Your rootfs image files are expected to be on the internal memory.
If you use Windows, don't use Notepad to edit menu.lst, use Notepad++ instead.
In Notepad++ go to Edit ➔ EOL conversion ➔ Unix. If the option is grayed, line endings already are in Unix format.
By the way, consider installing a Linux distribution such as (K)Ubuntu, Debian, Fedora or Linux Mint, many things are easier to do under Linux.
Installing OSes (rootfs filesystems)
| Name: | How to install: | Download: | Sources: | How to build your own: |
| Android openAOS-Cyanogenmod (Degu) |
Guidelines to install Gingerbread | openaos.org/wp-upload/gen8/2013-01-27/ | gitorious.org/openaos-cyanogenmod | Setting up buildenvironment Cyanogenmod gen7/gen8 |
| Debian LXDE | Debian gen8 | openaos.org/wp-upload/gen8/debian/ | Debian gen8 |
Currently known problems:
- Archos init is not replaced because of issues with original archos firmware. You will have to start the boot menu by going into recovery and choose developer edition.
- On Android, the on-touchscreen buttons of the Archos 24 and 32 won't work (will be fixed in next release)
More info on multiroot Bootmenu
See Multiroot Bootmenu Explained
If you are not a developer or not willing to debug and build things, consider this sentence as the end of the wiki page.
This part is for Linux only, i.e. NOT Windows!
Anyway a Windows user won't understand anything, because Windows has no bugs[citation needed] [proof needed] [f*ckmicrosoft needed]
Debugging
In the bootmenu, Advanced menu ➔ Debugging will bring you the serial menu where you can choose a debugging method:
- None = no debugging
- Serial = USB serial
- Ether = ethernet
- Both = USB + ethernet
If you enable serial, 3 connections will be available on your PC
On a Debian-based distro (Ubuntu & others), in a shell, you should get:
coder@devpc~$ dmesg | grep cdc_acm
[3365540.510632] cdc_acm 1-4:2.0: This device cannot do calls on its own. It is not a modem.
[3365540.510749] cdc_acm 1-4:2.0: ttyACM0: USB ACM device
[3365540.512000] cdc_acm 1-4:2.2: This device cannot do calls on its own. It is not a modem.
[3365540.512277] cdc_acm 1-4:2.2: ttyACM1: USB ACM device
[3365540.517070] cdc_acm 1-4:2.4: This device cannot do calls on its own. It is not a modem.
[3365540.517222] cdc_acm 1-4:2.4: ttyACM2: USB ACM device
- /dev/ttyACM0: Used for android console
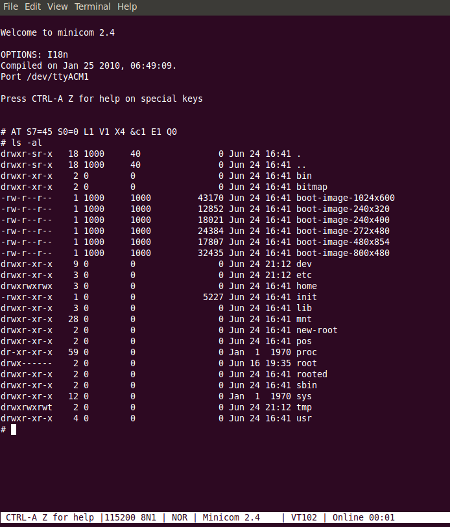
- /dev/ttyACM1: Gives you a shell in initramfs
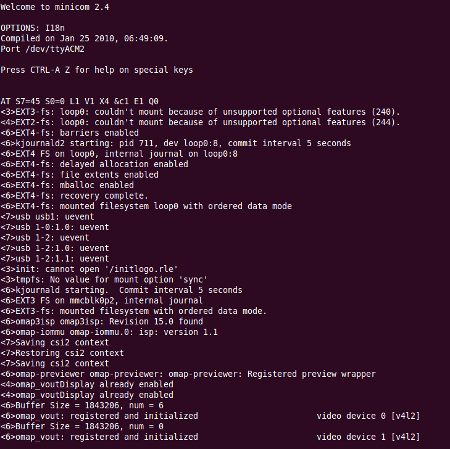
- /dev/ttyACM2: Output of kernel messages (/proc/kmsg)
Use a serial terminal emulator such as minicom, screen or putty to connect with the following parameters:
- Speed: 115200 (can be set higher or lower, doesn't matter much, we're on USB)
- Data bits: 8
- Stop bits: 1
- Parity: none
- Flow Control: none
Using minicom: Enable USB serial debugging.
Start your shell by entering the following on your pc:
$ minicom -D /dev/ttyACM1
Show kernel messages output by entering the following on your PC after the command choose on your archos the rootfs you want to start:
$ minicom -D /dev/ttyACM2
Building your own kernel from the openaos git source
This will build a GCC crosscompiler. At the very end, zImage should be located in buildroot/linux/arch/arm/boot.
$ git clone https://git.gitorious.org/archos-buildroots/gen8.git
$ cd gen8
$ git clone https://git.gitorious.org/archos-buildroots/gen8-kernel.git linux
$ cd buildroot
$ make (or make kernel should only build the zImage and crosscompiler)
When done with building the kernel you can build initramfs.cpio.gz
$ cd gen8
$ make dist
Everything including the zImage will be in openaos/target, it will also create the md5sum files for you. As a bonus there is the modules tarball as well.
Note: Make sure you have all the dependencies installed. Below are the dependencies needed for Ubuntu 10.04. That should give you a good starting point for other distros.
sudo aptitude install autoconf automake bison build-essential cmake flex gawk gperf intltool libbz2-dev libcap-dev libglib2.0-dev libxml-simple-perl libxml2-dev lzma m4 rpm subversion texinfo x11-xkb-utils xmlto zlib1g-dev ncurses-dev expect libtool libmpfr-dev libgmp3-dev libgphoto2-2-dev
Other useful links for developers
- How to repack initramfs
- How to make a custom splash image
- FBmenu bootmenu
- Unpacking original archos firmware
Feel free to contribute more or make changes...
Attachments
- minicom_shell.png
 (105.6 KB) - added by divx118 5 years ago.
 - minicom_shell.2.png (121.5 KB) - added by divx118 5 years ago.